PySpark example with FlowRunner
Pre-Requisites
- Install pyspark(just binaries, for detailed and complete installation refer this link Install PySpark on Windows)
pip install pyspark>=3.3.2
Example PySpark Flow
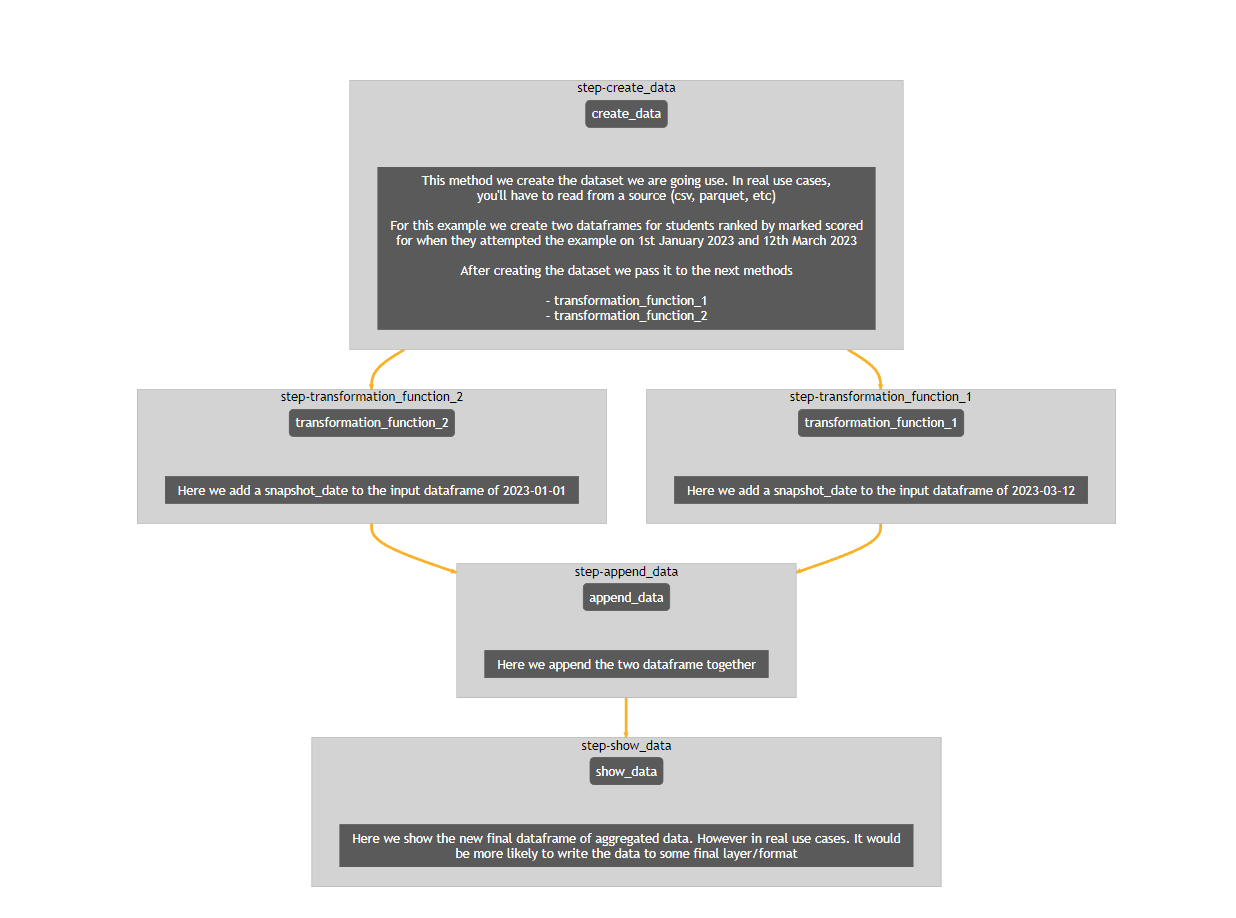
Create the following flow inside a file called pandas_example.py. For this example we create a dataset, add a date for each dataset append/union these together and then show the final dataset.
# -*- coding: utf-8 -*-
from pyspark.sql import SparkSession
from pyspark.sql.functions import lit

from flowrunner import BaseFlow, end, start, step

spark = SparkSession.builder.getOrCreate()


class ExamplePySpark(BaseFlow):
    @start
    @step(next=["transformation_function_1", "transformation_function_2"])
    def create_data(self):
        """
        This method we create the dataset we are going use. In real use cases,
        you'll have to read from a source (csv, parquet, etc)

        For this example we create two dataframes for students ranked by marked scored
        for when they attempted the example on 1st January 2023 and 12th March 2023

        After creating the dataset we pass it to the next methods

        - transformation_function_1
        - transformation_function_2
        """

        data1 = [
            ("Hermione", 100),
            ("Harry", 85),
            ("Ron", 75),
        ]

        data2 = [
            ("Hermione", 100),
            ("Harry", 90),
            ("Ron", 80),
        ]

        columns = ["Name", "marks"]

        rdd1 = spark.sparkContext.parallelize(data1)
        rdd2 = spark.sparkContext.parallelize(data2)
        self.df1 = spark.createDataFrame(rdd1).toDF(*columns)
        self.df2 = spark.createDataFrame(rdd2).toDF(*columns)

    @step(next=["append_data"])
    def transformation_function_1(self):
        """
        Here we add a snapshot_date to the input dataframe of 2023-03-12
        """

        self.transformed_df_1 = self.df1.withColumn("snapshot_date", lit("2023-03-12"))

    @step(next=["append_data"])
    def transformation_function_2(self):
        """
        Here we add a snapshot_date to the input dataframe of 2023-01-01
        """
        self.transformed_df_2 = self.df2.withColumn("snapshot_date", lit("2023-01-01"))

    @step(next=["show_data"])
    def append_data(self):
        """
        Here we append the two dataframe together
        """
        self.final_df = self.transformed_df_1.union(self.transformed_df_2)

    @end
    @step
    def show_data(self):
        """
        Here we show the new final dataframe of aggregated data. However in real use cases. It would
        be more likely to write the data to some final layer/format
        """
        self.final_df.show()
        return self.final_df
Let’s show our Flow
Run the following command to show() your flow. This gives us a description based on the docstrings of what our flow is actually going to do, without actually running it
python -m flowrunner show pandas_example.py
# we create an instance of the class and run its corresponding method
ExamplePySpark().show()
You should see the following output:
Welcome to flowrunner!
2023-03-12 19:50:47 LAPTOP flowrunner.system.logger[22656] INFO Found flow ExamplePySpark
2023-03-12 19:50:47 LAPTOP flowrunner.system.logger[22656] DEBUG Validating flow for ExamplePySpark
✅ Validated number of start nodes
✅ Validated start nodes 'next' values
✅ Validate number of middle_nodes
✅ Validated middle_nodes 'next' values
✅ Validated end nodes
✅ Validated start nodes 'next' values
2023-03-12 19:50:47 LAPTOP flowrunner.system.logger[22656] DEBUG Show flow for ExamplePySpark
create_data


        This method we create the dataset we are going use. In real use cases,
        you'll have to read from a source (csv, parquet, etc)

        For this example we create two dataframes for students ranked by marked scored
        for when they attempted the example on 1st January 2023 and 12th March 2023

        After creating the dataset we pass it to the next methods

        - transformation_function_1
        - transformation_function_2

Next=transformation_function_1, transformation_function_2


transformation_function_2


        Here we add a snapshot_date to the input dataframe of 2023-01-01

Next=append_data


transformation_function_1


        Here we add a snapshot_date to the input dataframe of 2023-03-12

Next=append_data


append_data


        Here we append the two dataframe together

Next=show_data


show_data


        Here we show the new final dataframe of aggregated data. However in real use cases. It would
        be more likely to write the data to some final layer/format
Display our Flow
This requires IPython style interactive notebooks
python -m flowrunner display pandas_example.py
# we create an instance of the class and run its corresponding method
ExamplePySpark().display()
Run our Flow
Now that we have an idea of what our Flow is going to do, let’s actually run it.
The following command will run the flow
python -m flowrunner run pandas_example.py
# we create an instance of the class and run its corresponding method
ExamplePySpark().run()
You should see the following output
2023-03-12 19:54:12 LAPTOP DEBUG Validating flow for ExamplePySpark
2023-03-12 19:54:12 LAPTOP WARNING Validation will raise InvalidFlowException if invalid Flow found
✅ Validated number of start nodes
✅ Validated start nodes 'next' values
✅ Validate number of middle_nodes
✅ Validated middle_nodes 'next' values
✅ Validated end nodes
✅ Validated start nodes 'next' values
2023-03-12 19:54:12 LAPTOP DEBUG Running flow for ExamplePySpark
        Name snapshot_date  marks
rank1  Hermione    2023-03-12    100
rank2     Harry    2023-03-12     85
rank3       Ron    2023-03-12     75
rank1  Hermione    2023-01-01    100
rank2       Ron    2023-01-01     90
Conclusion
You’re all set! You can whatever you would like to this Flow as per your use case!
Additional Resources: Notebook Examples(Including Pyspark and Databricks Notebooks)